
In a way, I’ve always had a fascination with “bulletproof vests” ever since I first heard of them as a kid. My appreciation for them has matured over the years, as well as my understanding of them. Now I know that there is nothing that is truly “bulletproof,” but rather bullet resistant. There’s always a bigger, faster, more powerful bullet out there that can make it through any armor you can come up with.
This has been the battle of the ages, since long before guns were invented. The contest between armor and armament brought us the great suits of armor from the Middle Ages. But it has also brought the flack jackets of the Vietnam era, as well as the improved ballistic armor we have today.
With this constant race, it’s no wonder that individuals and companies are constantly working to see if they can come up with a better ballistic armor. In the case of the companies, this is obviously for sale; but in the case of individuals, it’s survival they have in mind. Although… I have to say that I’m not sure how well some of these inventors are going to come out in the Darwin awards; you know… survival of the fittest.
Such was the case of an armor composite I saw a few years ago, which used a combination of denim and construction adhesive. Even though it supposedly worked for the guy who made the video, from my own testing, I’d say the only thing that particular attempt will do is ensure that the coroner finds denim fibers and traces of construction adhesive in the wound, along with lead and copper.
But I can’t say the same about the latest combination of materials that came across my desk. This was a combination of ceramic tile, stainless steel and fiberglass. I decided I needed to test this one out.

Making the Armor
What intrigued me about this particular combination was that the materials that this inventor chose materials that have all been successfully used in ballistic armor before. The innovative part here was that he chose to use them together.
Ceramic
A number of different successful ballistic armor designs have been done with ceramic plates installed.
Three-quarter inch thick ceramic plates, over Level IIIA soft body armor is considered effective for Level III armor against rifles. The big problem is usually dealing with the weight.

What I did was to use ¼” thick ceramic floor tile, which is what is commonly used in DIY body armor. Rather than using a grid of 2” square tiles, I chose a single 6” square tile, as I was only planning on firing one test shot at it. The idea of using 2” square tiles is common, because the ceramic tends to shatter in a spiderweb pattern when shot.
In expectation of this shattering, I covered the front side of the ceramic tile with a layer of duct tape, so as to attempt to hold the pieces together as much as possible. I didn’t bother covering the back side, as that side of the tile is not smooth, so the tape would not stick well. I fully expected this tile to be shattered, without doing more than slowing the bullet slightly.
Steel
Ballistic chest plates are made of a special ballistic steel, formulated for the purpose. A ¼” thick ballistic steel plate over Level IIIA armor is also considered to be effective as Level III armor against light rifle fire. In my own testing I was able to shoot a 5.56mm rifle round through a ¼” ballistic steel plate, which would tend to invalidate it for body armor. However, the steel lowered the velocity of the slug to the point where it was trapped in the layers of Kevlar backing it; so it was successful.
I have never heard of stainless steel being used for any sort of ballistic armor. Compared to regular steel, stainless steel has the addition of chromium (think chrome plating) to resist rusting. The actual mixture of steel, chromium and other minerals varies, depending on the grade of stainless steel.
For this testing, I am using a 0.024” thick or 24 gauge piece of 304 stainless. This is a low-grade stainless steel, known in the automotive industry as “muffler stainless” because that is what it is commonly used for. I didn’t have high hopes for it.
Fiberglass
Fiberglass is actually an amazing material, where ballistics are concerned. It has several advantages to it, including that multiple layers of material are used. With multiple layers, the bullet has to pierce each layer individually, even though they are all bound together by the fiberglass resin or epoxy. In the process of breaking through each layer, some energy is lost, making it harder for the bullet to break through the next layer.
Bulletproof safe rooms are actually made using fiberglass panels. Typically, 1 ¼” of fiberglass is used, made up of three 3/8” thick panels. Using multiple panels like this allows the installer to offset the seams, improving the ballistic protection that the fiberglass provides.
For the purpose of this test, I made a panel using 30 layers of 200g fiberglass cloth, bound together with fiberglass resin. This gave me a panel that was 0.035” thick. The main reason I chose 30 layers, is that I’ve shot 24 layers before and I know that a 9mm bullet will penetrate that much. However, it won’t penetrate 45 layers.

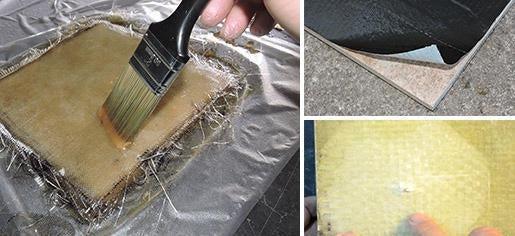
When making any sort of ballistic plate out of fiberglass, it is necessary to paint the resin onto each layer individually, as it is added to the stack. This is to ensure that all the layers are fully wetted and there are no air bubbles in the stack. I’ve seen people stack up their fiberglass cloth and just pour in the resin, but this almost always results in creating air bubbles.
As you can see from the picture below, I made my panel oversize (8” square) then cut it down to size. The material underneath the fiberglass is plastic food wrap, which I taped to my workbench, in lieu of using any sort of a mold. The particular plastic wrap I am using is a freezer wrap, which is coated on one side. That makes it easy to peel off the finished panel.
Testing the Panel
The specifications for ballistic body armor levels come from the National Institute of Justice and provide specific rounds that are to be fired at the body armor in testing for each level. The most common of these is the 9mm, although different levels specify different muzzle velocities. In addition to the 9mm, traveling at 1400 fps, level IIIA also specifies testing with a .44 magnum semi-jacketed hollow point, traveling at 1400 fps. As I don’t own a .44 magnum, I chose to use only the 9mm.
From previous testing, I can state that the 9mm has greater penetrating power than any other caliber of pistol round, other than the FM FiveseveN. However, in all fairness to the 9mm, the FM FiveseveN is basically the same bullet as the 5.56mm NATO, on a shorter cartridge for use in pistols. It was developed specifically for the purpose of defeating ballistic body armor, and is therefore known as the “mata policia,” which is Spanish for “kill police.”
As a general rule of thumb, ballistic armor is said to be compromised once it has been hit by one round. Therefore, my intention was to test it with only one round. As it was, I fired two rounds at it, because it was the first time I had used that particular pistol; therefore, my first shot was on the edge of the plate.
Fortunately, I have a very good relationship with the owners of my local shooting range, so they allow me to do all sorts of strange things, like testing these panels, without question.
Test Results
Let me begin by saying that I was a bit surprised by the test results I had. I was fully expecting the 9mm round to penetrate the ceramic and stainless steel and get trapped in the fiberglass. However, the round was actually stopped by the stainless steel, which I hadn’t thought was thick enough to stop it.
Here’s the front of the panel (on the left), where you can see the penetration of the bullet into the ceramic tile.

This is the back side of the ceramic tile (on the right), showing the typical spiderweb cracking pattern. You can easily seen where the bullet passed through it.
For ceramic to be effective as a ballistic material, I believe it would have to be mixed with something fibrous, much like fiberglass.
One option I’ve thought of for years, is to use something like wire screening material, allowing the screen to act much like rebar does in cement.
However, to do any testing of this type would require having my own kiln for firing the plates, as no one else is willing to fire them for me.

Here’s the stainless steel plate, showing the indentation of the bullet. Surprisingly, it only deformed the plate by about 5/16” and did not penetrate through it.
The second indentation, on the right side, is from the shot that hit the edge of the plate.
Finally, here’s the fiberglass panel and the back side of the stainless steel panel, together.
You can easily see how the two align, and that the force of the bullet’s flight passed through the stainless steel and into the fiberglass, even though the bullet didn’t. That’s why the fiberglass is discolored. The discoloration is actually showing the part of the panel that is delaminated from the force of the blow.]

Fiberglas Alone
I didn’t bother testing the fiberglass plate alone, as I had done so in previous tests. Besides, my fiberglass panel was already compromised, because of the impact of the bullet delaminating the fiberglass layers.
However, as you can see in the front and rear pictures below from that previous testing, a ½” thick fiberglass plate will stop a 9mm round. The delamination showing in the rear picture (on the right) is from the 9mm round, not the .44 mag; due to the greater penetration of the 9mm.

While I personally think I’ll stick with my Kevlar body armor that I made, it looks from this testing that either stainless steel or fiberglass can effectively be used for making improvised body armor.
If I was to actually need this armor, I think I would do a bit more testing, just to make sure that this test wasn’t just an anomaly.
Another interesting thought that this brings up is that a suit of medieval plate armor, made of 24 gauge stainless steel or greater, would probably be pretty effective against pistol rounds.
It would be slightly heavier than steel armor, but only by about 4 percent. Again, I’m not sure I’d want to bet my life on it, but the possibility of it working is at least interesting enough for further exploration. I just might have to try that some day.

2 comments
I have a sort of “berm-cabin” that I have been building for the last few years. It’s just a precaution in case of social upheaval or what have you. Most of it is covered in dirt. Which, depending on the type of earth used is an excellent way to stop any flying shapnel or bullets. Clay and sand both work well. Only one side of the structure is not buried, and I used fiberglass, and in some areas gigacrete, to bolster it. Then planted blackberry bushes in front to keep people away from the wall itself. My point is, you could try gigacrete instead of ceramic. It’s still heavy, but does stop bullets. And would be much easier to work with than a mesh for crushed ceramic. Personally I also believe that it would make more sense to fabricate riot sheilds from a few materials rather than actually making armor. Steel fiberglass and ceramic sounds super heavy to actually be wearing, and a tall sheild offers more complete coverage. I am going to start tinkering with the idea though. The samurai used raw silk as a type of armor from arrows. And that could easily be added to fiberglass resin. Or that and a welding blanket? In the end, it’s better to just avoid getting shot……which SOUNDS easy. It’s easy until it not I guess.
Thank you for sharing your experment